5 Steps to Automate Social Media Scheduling
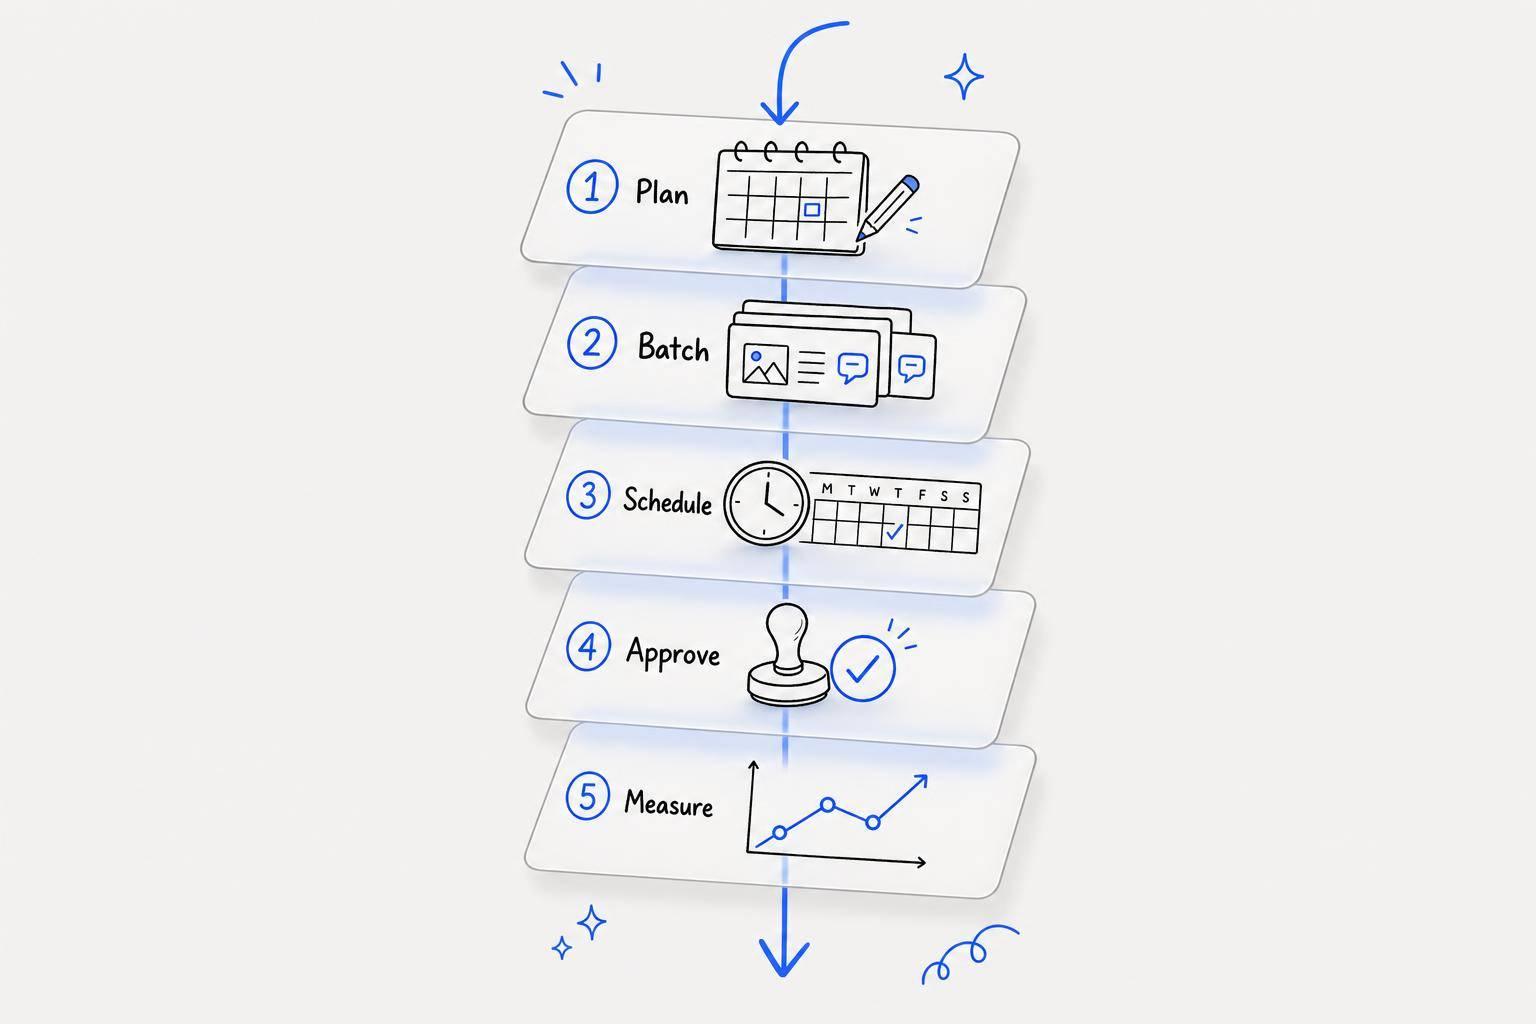
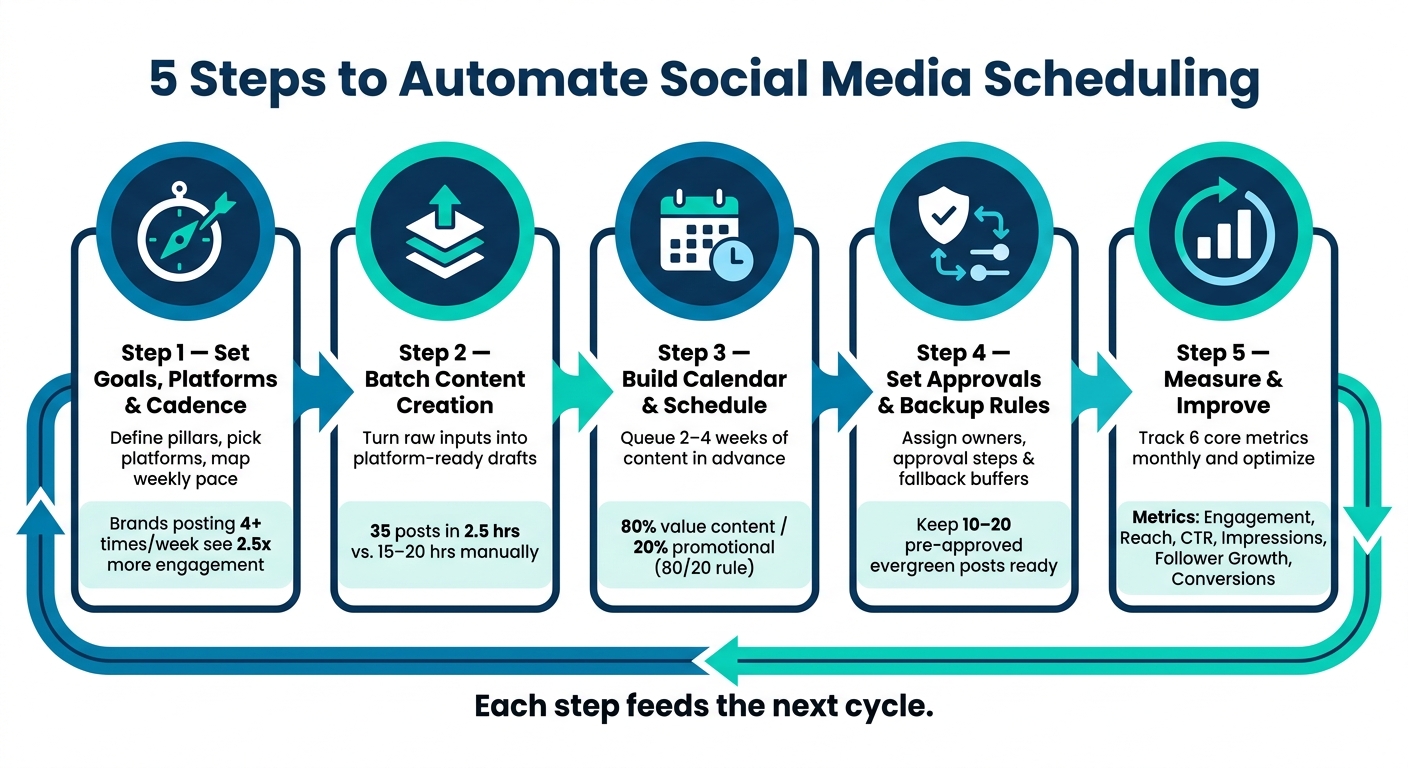
If I want social media to stop eating up my day, I need a system. This setup comes down to five parts: pick goals and posting times, batch content, load a calendar, lock in approvals, and review results each month.
Here’s the short version:
- Step 1: I set goals, choose platforms, and map out a weekly posting pace.
- Step 2: I batch posts from raw notes, blog links, or voice memos.
- Step 3: I schedule 2–4 weeks of content at a time instead of posting day by day.
- Step 4: I assign owners, approval steps, and backup rules for missed posts.
- Step 5: I track engagement, reach, CTR, follower growth, and conversions to improve the next batch.
A few numbers stand out: brands that post 4+ times per week can see 2.5x more engagement, and batching can cut content work from 15–20 hours down to about 2.5 hours for 35 posts.
5-Step Social Media Automation System: From Planning to Results
How to Automate your Business' Social Media Content Calendar
sbb-itb-9f5fe42
Quick Comparison
| Step | What I set up | Main outcome |
|---|---|---|
| 1 | Goals, platforms, cadence | A clear posting plan |
| 2 | Batch content workflow | Drafts ready for review |
| 3 | Calendar and scheduler | Posts queued in advance |
| 4 | Approvals and handoffs | Fewer publishing mistakes |
| 5 | Monthly reporting | Better posts next cycle |
In simple terms: I’m building a repeatable posting system, not relying on memory, rush jobs, or last-minute fixes.
Step 1: Set Goals, Platforms, and Posting Cadence
Before you open a scheduling tool, get clear on what your content is supposed to do. That one decision changes everything.
If the main goal is traffic, you’ll plan a different calendar than if the goal is leads, engagement, or just staying consistent. It affects which platforms matter most, how often you post, and what kind of posts you line up. Put simply: these choices become the rules your automation follows.
Match Business Goals to Weekly Publishing Targets
Each goal needs a different content mix.
If you want engagement, lean on questions, threads, and trend-driven posts. In that case, higher-frequency platforms like Instagram and TikTok make sense, with around 4–7 posts per week.
If the goal is website traffic, put more weight on blog promo posts and link-focused LinkedIn updates.
If you’re after lead generation, shift toward direct offers, product spotlights, and social proof like testimonials or case studies.
If your focus is brand consistency, use a steady two-week rolling schedule.
There’s a good reason to be consistent here. Brands posting 4+ times per week see 2.5x more engagement than brands that post off and on.
Assign Content Pillars to Days and Time Zones
Once the goal is set, define 3–5 content pillars using a social media content creation checklist. These are the repeat themes that shape what you make. Common examples include Educational, Behind-the-Scenes, Social Proof, Product Features, and Community.
Then give each pillar a home in the week. For example, Mondays can be for motivation or industry insights, Wednesdays for tips and how-tos, and Fridays for social proof or customer stories. This gives your calendar a rhythm you can repeat without starting from scratch every week.
For U.S. audiences, start with 9:00 AM PT / 12:00 PM ET if you want to hit both coasts in one pass. That setting should flow straight into your scheduler. And one small but important detail: set the scheduler to your business time zone, not UTC.
Use these ranges to fill your calendar:
| Platform | Recommended Cadence | Best Time Windows (U.S.) |
|---|---|---|
| 4–7 posts/week | Weekdays 11:00 AM–1:00 PM; 5:00–7:00 PM | |
| 3–5 posts/week | Tue–Thu 8:00–10:00 AM; 12:00–2:00 PM | |
| 3–4 posts/week | Weekdays 9:00–10:00 AM; 3:00 PM | |
| TikTok | 4–7 posts/week | Evenings 7:00–9:00 PM; weekend mid-morning |
| X (Twitter) | Daily or higher | Weekdays 8:00–10:00 AM; 7:00–9:00 PM |
Once your cadence is locked in, batch the posts and move them into your content pipeline. With goals, pillars, and timing in place, the next move is turning that plan into draft posts.
Step 2: Build a Content Pipeline with Draft AI
With the plan in place, use Draft AI to turn rough source material into posts you can batch and prep fast.
Generate Posts in Batches from Raw Inputs
Draft AI can work from several kinds of raw input: blog URLs, voice messages, bullet-point notes, or a topic brief. Drop in your business or blog details, generate a swipeable idea stack, and keep the strongest ideas.
Then take one core idea and spin it into drafts for each platform. After that, sort everything by format. This is where batching pays off: one main message can turn into a LinkedIn text post, an Instagram carousel, a Threads/X post, and an Instagram Reels script in a single work session. Done this way, batching can produce about 35 posts in 2.5 hours instead of 15 to 20 hours by hand.
| Content Format | Target Platforms | Key Inputs Needed |
|---|---|---|
| Text Posts | LinkedIn, Facebook | Topic brief, brand tone, target audience, CTA |
| Carousels | Instagram, LinkedIn | Core insight or how-to steps, slide-by-slide breakdown, visual style preferences |
| Threads/X Posts | X (formerly Twitter) | Punchy hook, outline of key points, character limits |
| Reels Scripts | Instagram, TikTok | Scripted message and visual scene descriptions |
Save each draft by platform and content pillar before you review voice and visuals. That small step saves a lot of backtracking later.
Keep Brand Voice and Visual Style Consistent
Use writing-style matching, brand colors, and layout controls so posts feel like they came from the same brand, not five different people. Preview each post before it goes out, especially to catch layout problems like awkward cropping in Instagram’s 4:5 feed ratio.
Then do a final human check for facts and tone before anything moves into your scheduler.
After approval, move the drafts into the calendar in Step 3.
Step 3: Build the Calendar and Automate Scheduling
Once the drafts are approved, the next job is simple: turn them into a schedule you can repeat. Pull the approved drafts from Step 2 and place them into each calendar slot.
Create a Reusable Weekly or Monthly Content Calendar
Fill your calendar in 2–4 week blocks. That approach cuts out the daily “what do I post today?” scramble and helps you stay consistent.
Each calendar entry should include the platform, format, pillar, owner, approval status, publish date and time, asset links, and UTM parameters. Think of approval status as the checkpoint: only posts marked Approved should go into the scheduler.
To keep things from getting too sales-heavy, use the 80/20 rule: about 80% of posts should give value - either educational or entertaining - while 20% can be promotional. It also helps to tie pillars to certain days. For example, you might run educational posts on Tuesdays, social proof on Thursdays, and behind-the-scenes on Saturdays. That gives the calendar a steady rhythm.
Use the setup that fits how your team actually works. There’s no point forcing a system that looks neat on paper but slows people down. Using the best content creation tools can help bridge that gap.
Comparison Table: Calendar Structures and Scheduling Patterns
| Calendar Structure / Pattern | Description | Best For |
|---|---|---|
| Platform-First | Content built for one main channel. | Solo creators, niche brands |
| Pillar-First | Content grouped around 3–5 core themes, then adjusted for each channel. | Small businesses, B2B teams |
| Campaign-First | Every post supports a launch, event, or promotion. | Agencies, multi-location brands |
| Batch Scheduling | Create and queue 2–4 weeks of content in one focused session. | Small teams, efficient creators |
| Evergreen Reshares | Recycle top-performing posts that aren’t time-sensitive. | Solopreneurs, resource-strapped teams |
| Daily Scheduling | Schedule posts manually, one at a time. | Real-time news, high-engagement accounts |
A quick heads-up: automated content creation doesn’t cover everything. Some Instagram formats, like Stories with interactive stickers, still need manual confirmation even when you use a scheduler. Some TikTok posts, especially ones tied to trending audio, may also need a manual push.
Meta and TikTok security tokens also tend to expire every 60–90 days, so set a repeating reminder to re-authenticate on that same 60–90 day cycle.
Step 4: Set Up Approvals, Rules, and Publishing Handoffs
A scheduled calendar only works if approvals are clear and fallback rules are already in place.
Once your drafts are sitting in the calendar, the next job is control: who moves each post forward, when, and under what conditions.
Define Roles, Approval Steps, and Deadlines
Give each stage one clear owner so handoffs don’t get stuck. A steady workflow should move through these status points: Briefed → Drafting → In Review → Approved → Scheduled → Published.
A simple setup looks like this: content creators build the copy and assets, editors check brand voice, approvers give final sign-off, and admins handle system settings and API permissions.
This is the path from scheduled draft to live post.
| Handoff Stage | Primary Owner | Recommended Deadline |
|---|---|---|
| Drafting | Content Creator | 7–14 days before publish |
| Review | Editor | 48 hours after drafting |
| Approval | Final approver | 72 hours before publish |
| Scheduling | Automation/Admin | Next scheduled run |
| Final QA | Social Media Manager | 24 hours before publish |
Before a post reaches Approved, review the copy, visuals, links, and platform-specific formatting. Not every post needs the same level of review, either. Evergreen content can often go through peer review. Product launches may need legal or brand sign-off. Crisis communications should go to executive approval.
One rule helps a lot here: lock the scheduler so only Approved posts can enter the queue. Keep Draft and In Review items read-only.
To cut down on review churn, approve posts in weekly or monthly batches.
Set Backup Rules for Missed Posts and Time-Sensitive Content
Once the approval path is set, decide what happens if a post misses its slot.
Even a solid workflow can hit a snag. A permission error, a broken connection, or an image URL that fails can stop a post from publishing. That’s why alerts matter. Set up Slack or email notices for failed publishes and stalled approvals so the team can step in before the slot is lost.
It also helps to keep a buffer of 10–20 pre-approved evergreen posts ready to go. If a draft runs late, you have something ready to drop in. If edits come back, move the post to In Review or Draft so it stays out of the publish queue.
For sensitive events, set a pause protocol ahead of time so nobody has to make it up on the fly. Hit the pause rule first. Then refill the empty slot from the evergreen buffer.
Step 5: Measure Results and Improve the System
Automation won’t get better by itself. It gets better when you send performance data back into the system every month. Without that feedback loop, you’re just running the same schedule again and again - whether it’s working or not.
Once posts go live, the work changes. You’re no longer focused on scheduling. Now you’re measuring what happened.
The six core metrics to track each month are engagement rate, reach, impressions, click-through rate (CTR), follower growth, and conversions. Each metric answers a different question.
- Engagement rate shows whether people connect with the content.
- Reach and impressions show how far your posts travel and how the platform distributes them.
- CTR shows whether your calls to action are doing their job.
- Follower growth shows whether your content is bringing in new people.
- Conversions, tracked with UTM parameters, show which posts led to sign-ups or sales.
Track the same six metrics every month. Then look for patterns, not one-off spikes, when you plan the next calendar.
| Metric | What It Tells You | What to Do with It |
|---|---|---|
| Engagement Rate | Whether the content resonates | Double down on high-performing pillars and formats |
| Reach / Impressions | How well the platform distributes your posts | Adjust posting times or hashtags if reach is flat |
| CTR | Traffic-driving effectiveness | Rewrite CTAs on posts with low click rates |
| Follower Growth | Audience attraction and retention | Revisit brand voice if growth stalls |
| Conversions | Business results | Track which posts drove the result |
Run a Simple Monthly Optimization Checklist
Export monthly data into one report. Then tag your top and bottom performers by content pillar - such as educational, promotional, or behind-the-scenes - and by format, like Reel, Carousel, or text post.
This is where things get useful. You’re not just collecting numbers. You’re looking for repeat behavior. Did educational carousels beat promotional posts over and over? Did Tuesday morning posts get more reach than Thursday afternoon posts?
From there, build a plain if-then hypothesis: "If we post educational carousels on LinkedIn Tuesday mornings, then engagement will increase". Then test that idea in next month’s calendar. If some formats and pillars keep falling short, cut them.
Send the winners back into Draft AI for the next batch. Use Draft AI to turn top-performing hooks, pillars, and formats into your next round of posts. That keeps the pipeline automated while making each cycle a little smarter.
Conclusion: The Full 5-Step Automation Checklist
Here’s the full process in one place. Use it during weekly or monthly planning:
- Set goals, platforms, and cadence - Define your content pillars and weekly publishing targets per platform.
- Build your content pipeline - Use Draft AI to batch-generate posts from raw inputs while keeping brand voice consistent.
- Build the calendar and automate scheduling - Load content into a central scheduling hub using a reusable weekly or monthly template.
- Set up approvals and backup rules - Assign clear roles, approval steps, and deadlines, and keep a backup buffer ready.
- Measure results and improve - Run the monthly audit, tag top and bottom performers, form a hypothesis, and update the next cycle accordingly.
Each step feeds the next cycle.
FAQs
How far ahead should I schedule posts?
Aim to schedule content at least 1 week in advance. One simple way to do that is to batch your creation, review, and scheduling into a single weekly session for the week ahead.
You can plan content weeks or even months in advance. But don’t fill every slot. Leave 10% to 20% of your calendar open for reactive or trending posts so your feed stays timely and human. Draft AI can help streamline content planning and organization.
What should I automate vs. do manually?
Automate repetitive work like content generation, bulk scheduling, and platform-specific formatting. Draft AI can turn raw input or voice notes into captions, scripts, and carousels.
But don’t hit publish on autopilot. Do a manual review to check tone, accuracy, and brand fit.
For timely, trending, and industry-specific topics, it’s better to work by hand. Those posts depend on context, and context can change fast.
How do I know if my schedule is working?
Review your analytics from the past 90 days to spot baseline trends in reach, engagement rate, and the post types that did best.
Then use your scheduling tool’s reports or heat maps to line up posting times with when your audience is active. That gives you a clearer picture of whether timing, format, or topic is doing the heavy lifting.
At the end of each month, look back at which content pillars and formats performed best. From there, test different posting windows for 2 to 4 weeks and use the results to fine-tune your schedule.